Tips for updating Scenario Tool#
Workbook essentials: It’s recommended to use the Scenario Tool worksheets as your templates. Data for all components used in the model are formatted as Excel Tables. Additional tables and named ranges are there for QA/QC but they do not flow to the model. In some parts of the workbook (such as “Passthrough Inputs” and “RESOLVE Case Setup“), name ranges are defined that directly control the data flow into the model runs, thus, it is recommended to ensure updated/edits will not cause name ranges to get removed (this happens more often when removing data/tables or moving worksheets between workbooks). Since the tables are large, each worksheet has two tables on the side with the list of scenarios defined in the worksheet and hyperlinks for easier navigations throughout the worksheet. For best experience, do not rename the following tabs: “Cover”, “RESOLVE Case Setup”, “Passthrough Inputs”, “Timeseries Clusters”, “Lists”, “Scenarios”, and “xlwings.conf” since they are directly linked to the code that reads the data from Scenario Tool.
Data update essentials: If you wish to add a list of resources with specific data scenario tag (for example to include them in a sensitivity), the best practice is to copy the entire worksheet and paste it in the same Scenario Tool as a new worksheet (this will ensure all table formats and sensitive variable names are preserved), then start overwriting the component list and values of the columns or remove extra data. Make sure you give it a distinct scenario name for your added data and include it in your case settings. You can also overwrite values and names of existing resources and components if the changes are permanent.
Optimization data flow essentials: Pay attention to grey color font text on one of the rows above the tables in each worksheet. Only columns that have the grey text on top will be used in optimization model formulation. If you remove any of the grey font variable names, the data provided in that column will be excluded and it may cause an error in the optimization.
Here are some tips to have in mind when updating the Scenario Tool or setting up new cases:
Avoid using very long component names.
Ensure all component names are distinct in the Scenario Tool.
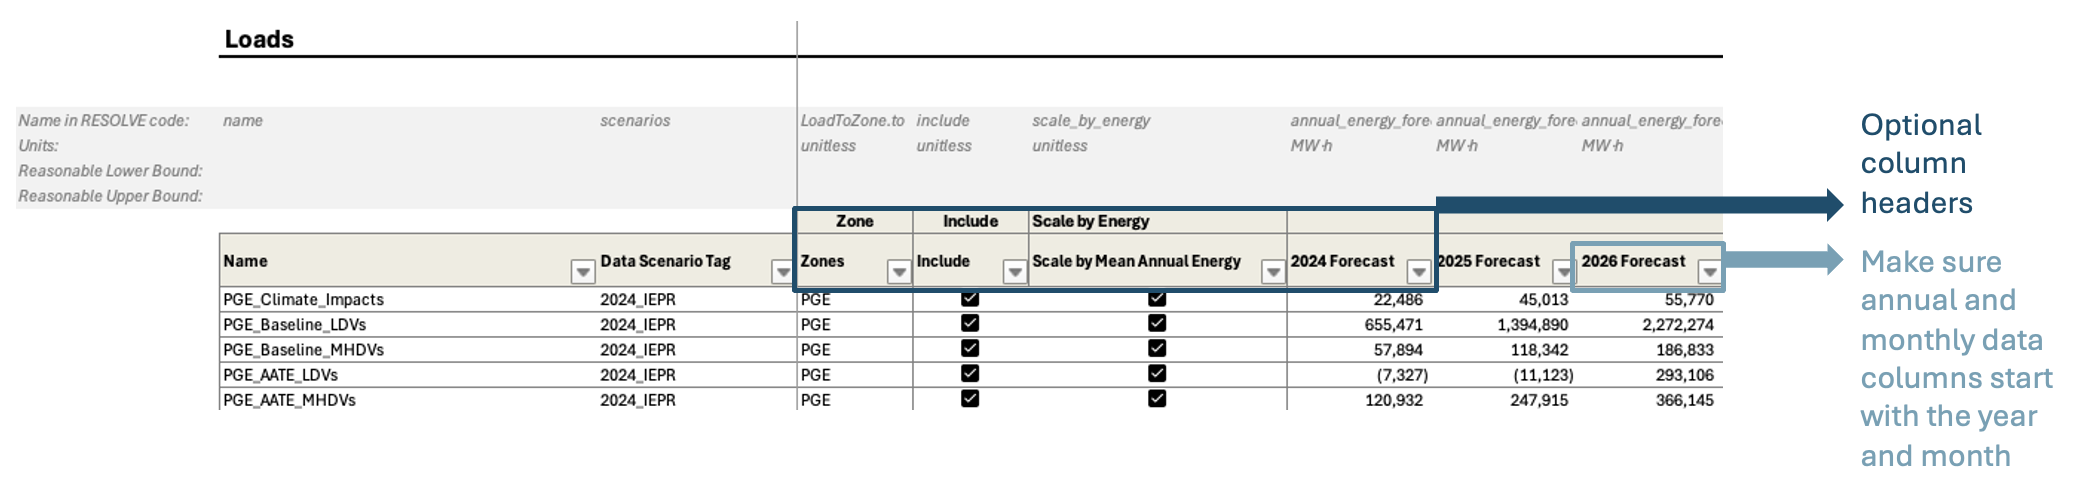
Be careful about editing table headers. In every worksheet, on top of component data, there is grey colored rows that include the variable name used in the model backend associated with each particular data column, units and may include reasonable upper and lower bounds.
If a data column has no variable name, that means data in that column will not get used in the model.
Do not edit the name without checking the variable names in the backend.
Component table column names are generally flexible, and user-defined except for annual and monthly data that must start with the year or month, respectively.
Most worksheets have small tables on the very left side that list all existing scenarios on the worksheet, as well as a list of table column names and a hyperlink for easier navigation in large data tables. The links are useful to click on and jump to the related section of interest.
It is recommended to keep the format of the component names for new component additions to make sure they are compatible with downstream results viewer workbooks.
For example, start load components with the zone name followed by load component name. Another example is fuel names which is recommended to use zone name, fuel name followed by “_Fuel”.
Another example, assign one of the standard names for “RV Agg Group” column in resource tabs for any new resource you are adding. That will make sure that the resource will get aggregated in the hourly results reporting correctly.