Initial Model Set-up#
This Section will walk you through on how to install and set up the model. A lot of this should only be one-time so please make sure that this process is carried out carefully.
All about environments#
Python environments for this project should be thought of as isolated computational spaces
that will have the necessary configurations needed for you to run the specific project or model - which in this case is RESOLVE
Environments help in setting up packages, dependencies, libraries etc by running a simpe command and do not require much computational background and knowledge - thus enabling the usage of the product for a wide array of stakeholders.
There are many softwares that help in creating, activating and maintaining environments - one of which is Anaconda
We recommend using the Anaconda Python distribution and package manager.
During the installation process, we recommend selecting the “Add Anaconda3 to my PATH environment variable” option
so that you have easy access to the conda command from the command line.
If you run into any
conda not recognizedorcommand not found: condamessages in the command line in the following steps, this means that you did not add Anaconda to your PATH. You can add either rerun the installer (easiest) or manually add Anaconda to your PATH (see these instructions for some help).
Initial conda Set-up#
In order for conda to work properly, you will need to initialize your “shell” (command line, e.g., Command Prompt).
Windows#
Option 1: Using Command Prompt#
If you use Command Prompt, open a new Command Prompt window and enter:
conda init cmd.exe
Option 2: Using PowerShell#
If you use PowerShell, open a new PowerShell window and enter:
conda init PowerShell
Then, close all PowerShell windows, and open a new PowerShell window using the “Run as Administrator” option (right-click on the PowerShell application icon in the Start Menu to find this option). Then, enter the following command:
Set-ExecutionPolicy Unrestricted
Then, close the PowerShell window and open a new one.
macOS Terminal#
Since macOS Catalina (10.15), the default “shell” program is zsh. These instructions assume you’re on a recent version of macOS.
Open Terminal and use the following command:
conda init zsh
Earlier versions of macOS use bash, so replace zsh in the command above with bash.
Creating Environments#
Once you have Anaconda set-up and have the necessary RESOLVE files and folders you are ready
to create environments.
We will use the conda command to create an isolated environment for the RESOLVE to run within, without
disturbing any other Python packages you may have already installed (see the conda documentation for more details on conda environments).
To create the conda environment, we will use the environment.yml
file at the top level of the repository. Open your shell of choice and navigate into your cloned copy of the repository.
Then, run the following command:
Create an environment:
conda env create -f environment.yml
In general it is best practice to name your environment for better tractability. That can be as follows:
conda env create -f environment.yml --name your-environment-name
Environments using Pycharm#
It is also possible for users to directly use Pycharm as an interface to create and manage Python based environments for RESOLVE.
Step 1: Navigate over to your RESOLVE specific folder on Pycharm - make sure that the file environment.yml is at the top of the directory
Step 2: At the bottom left of your Pycharm Window, click on the terminal icon to open up the terminal. This should show your selected directory
step 3: In the terminal enter the following code
Create an environment called
resolve-test-env:conda env create -f environment.yml --name resolve-test-env
Note that the name of the environment is non-consequential and can be set per user’s preference.
Once you enter the code, it will take about 2-5 minutes for the system to setup your environment - note that this is a one-time exercise.
After the installation is done - the terminal will prompt you to either activate or de-activate the environment, which will look as follows:
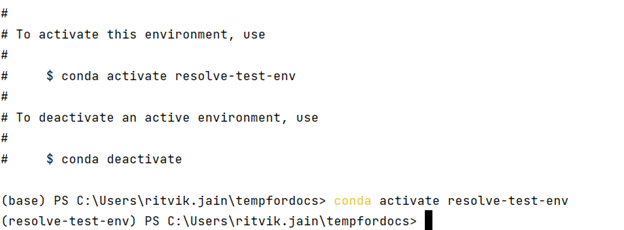
Activating the environment would mean that you now have the virtual computing capabilities to run the model. If you would like to learn more about virtual environments and dependencies, supplemental information can be found here
In order to maintain compatability between different versions, and updates of RESOLVE, it is best practice to use new environments for each new release. Environments do not interact with one another and this would make sure that the user is able to switch back and forth between different resolve versions with ease.
Solvers#
Optional
The RESOLVE environment comes with the open-source HiGHS solver, which enables out-of-the-box solving of RESOLVE cases on any platform. Commercial solvers like Gurobi, IBM CPLEX, and FICO XPRESS offer additional solver features & typically substantially faster solve times. If you have licenses for any of these solvers, RESOLVE will work with them; follow the vendor installation & licensing instructions.
Please note that CPUC RESOLVE cases are typically large and often take 4-8 hours to run (including saving inputs to creating the optimization problem, to solving the optimization and saving the results). Although other solver options are available, E3 uses Gurobi and has not qualified running RESOLVE on other solvers.